
React Event Handling: SyntheticEvent Architecture & Examples
Handling events in React is very similar to handling events in standard DOM elements, but with a few critical syntactic and architectural differences. React events are named using camelCase (e.g. onClick instead of onclick), and you pass an actual JavaScript function reference rather than a string.
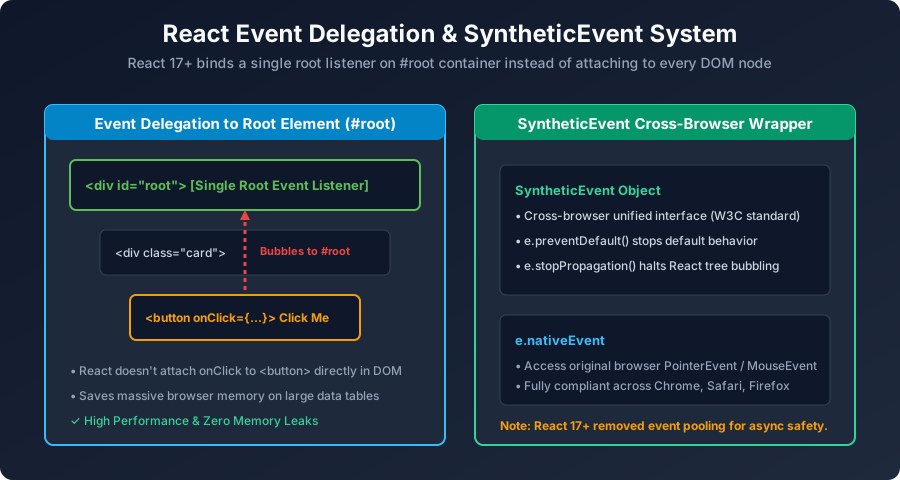
Figure 4: Event Delegation Architecture: Events bubble to the root container and are wrapped in cross-browser SyntheticEvent objects.
Basic Event Handling Example
Here is a functional component demonstrating button clicks and keyboard inputs:
import React, { useState } from 'react';

function EventPlayground() {
  const [inputText, setInputText] = useState('');

  // 1. Click Handler
  const handleButtonClick = (event) => {
    console.log('Button clicked! Synthetic Event:', event);
    alert('Action triggered!');
  };

  // 2. Keystroke Change Handler
  const handleInputChange = (event) => {
    // Read input text from SyntheticEvent target
    setInputText(event.target.value);
  };

  return (
    <div className="event-box">
      <button onClick={handleButtonClick}>Click Me</button>
      <br /><br />
      <input
        type="text"
        value={inputText}
        onChange={handleInputChange}
        placeholder="Type something..."
      />
      <p>You typed: {inputText}</p>
    </div>
  );
}

export default EventPlayground;
Passing Arguments to Event Handlers
Frequently, you need to pass extra parameters (such as an item's unique database ID) to an event handler. You can achieve this using an inline arrow function:
function ProductList() {
  const products = [
    { id: 101, title: 'Laptop' },
    { id: 102, title: 'Keyboard' }
  ];

  const handleBuy = (productId, event) => {
    console.log(`Purchased product ${productId}`, event);
  };

  return (
    <ul>
      {products.map(p => (
        <li key={p.id}>
          {p.title}
          {/* Wrap handler in an arrow function to pass arguments */}
          <button onClick={(e) => handleBuy(p.id, e)}>
            Buy
          </button>
        </li>
      ))}
    </ul>
  );
}
Stopping Default Behavior (e.preventDefault)
In traditional HTML, returning false from an inline handler stops the default action (such as submitting a form or navigating an anchor link). In React, you must explicitly call e.preventDefault() on the SyntheticEvent:
function SimpleForm() {
  const handleSubmit = (e) => {
    e.preventDefault(); // Prevents full-page browser refresh!
    console.log('Form data submitted via JavaScript AJAX.');
  };

  return (
    <form onSubmit={handleSubmit}>
      <input type="email" placeholder="student@veewom.com" />
      <button type="submit">Subscribe</button>
    </form>
  );
}
Next Step: Conditional Rendering
Now let us examine how to display different UI elements based on state conditions in React Conditional Rendering.
Explore Related React JS Tutorials
Accelerate your React mastery by studying these tightly connected core tutorials:
Triggering re-renders through state setters.
Handling onSubmit, onChange, and event.preventDefault().
Toggling modals, dropdowns, and tabs on click.


You may also like this!
© Veewom.com. | Managed by PinePL
